With PhoneGap Build shutting down, many developers are now left trying to find options to continue building their Cordova-based applications. While several new services like Ionic’s Appflow and Monaca Cloud have entered the market as replacements. Their cost might be too much for the independent developer. One of the things that attracted many to use PhoneGap Build was it was included as part of your Creative Cloud subscription. There was even a free version for open-source projects. For those developers who are either resource constrained or want complete control over their build system, they should migrate to using the Cordova CLI and building locally.
There are four general steps we need to take to accomplish this:
Install the Cordova CLI
Install the native build environments
Migrate our existing PhoneGap Build App to use Cordova
Build and Test!
Step 1: Installing the Cordova CLI
The Cordova CLI is a free, open source tool that is actively maintained by many of the former PhoneGap team. It runs on Node.js and is available on NPM. You can learn more about it by visiting their site, https://cordova.apache.org/.
To install the Cordova command-line tool, follow these steps:
1. Download and install Node.js [https://nodejs.org/en/download/]. On installation you should be able to invoke node and npm on your command line.
2. Install the Cordova CLI using npm.
On OS X and Linux use the following command:
$ sudo npm install -g cordova
On OS X and Linux, prefixing the npm command with sudo may be necessary to install this development utility in otherwise restricted directories such as /usr/local/share. If you are using the optional nvm/nave tool or have write access to the install directory, you may be able to omit the sudo prefix. There are more tips available on using npm without sudo, if you desire to do that.
On Windows do the following:
C:\>npm install -g cordova
The -g flag above tells npm to install cordova globally. Otherwise it will be installed in the node_modules subdirectory of the current working directory.
To test the installation, simply run
$ cordova
on the command line with no arguments and it should print help text.
One of the major appeals of PhoneGap Build was not having to install the native build tools for each platform. This was especially true for Android, as it required multiple components to be properly installed. PhoneGap Build also allowed Windows users to compile iOS applications without needing a Macintosh.
Now that you are building locally, your will will need access to a Mac with Xcode installed to create your IPA files. Some options to get around this requirement are to use one of the “Mac in the Cloud” services or instead migrate to one of the PhoneGap Build replacements, or consider deploying your application as Progressive Web App.
Rather than rewrite the instructions outlined by the Apache Cordova team, I will point you to the specific instructions for each platform:
The iOS installation is basically just installing Xcode on your Macintosh.
Once this is done, we can validate that status of the tools by running a Cordova command to verify the state of them In the command line run the follow:
$ cordova requirements
You will see a report of the status of the various requirements. If something is not installed, you should go back and reinstall it.
Step 3: Migrate your existing PhoneGap Build App
The method I recommend is to migrate your existing PhoneGap Build app is to first start with a new Cordova application. To create a blank Cordova project using the command-line tool, navigate to the directory where you wish to create your project and run
$ cordova create [ID [NAME ]]
cordova create [ID [NAME [CONFIG]]] [options]
PATH ……………………. Where to create the project
ID ……………………… Reverse-domain-style package name – used in
NAME ……………………. Human readable name
With the basic application skeleton in place, we need to navigate to the project directory that was just created using the change directory, or CD command:
$ cd myapp
From the project directory, you need to add the platforms for which you want to build your app.
The general command is:
$ cordova platform add
To add the iOS platform
$ cordova platform add ios
To add the Android platform
$ cordova platform add android
These can take a bit to install, so be patient. Although you can install any platform, it does not mean you can compile for that platform.
With all the necessary requirements in place, we can perform our first build by running
$ cordova build
The process will take a bit, but it should generate the artifacts we need.
Since SDKs for Android and iOS come bundled with emulators, we can use them without the additional steps required to deploy them onto an actual device. We can target the emulator by running this command:
$ cordova emulate
The app will be built, the proper emulator launched and the app installed. This can take a bit. You may need to refer to the Cordova documentation to make sure you have the native environment setup correctly and the emulator/simulators configured correctly.
Now that we know we can build and emulate a basic Cordova app, we can move on migrating our actual application. With the platforms installed, let’s take a look at the directory structure that was generated:
There are some folders and files that might look familiar, and others that might be new to you. Now we can roll up our sleeves and do the real migration.
In most PhoneGap Build apps, you probably have a single www folder that contains your code, application resources and it’s config.xml file. This is typically the structure that I see:
resources
config.xml
css
img
index.html
js
Go ahead and replace the www folder that was created with the Cordova CLI with the contents of your PhoneGap Build www. Next, we are going to move your resources directory, the one containing your app icons and splash screens and move it to the root directory for the project. The final step will be editing the main config.xml file. By default, the Cordova CLI generates a bare-bones config.xml file, so references to any icons or splash screens are not included.
I recommend following standard directory and file naming structures to reduce possible headaches. In the main config.xml file add the following elements. If you are not targeting that particular platform, feel free to skip it.
This file contains bidirectional Unicode text that may be interpreted or compiled differently than what appears below. To review, open the file in an editor that reveals hidden Unicode characters. Learn more about bidirectional Unicode characters
With the icons and splash screens migrated, we can turn our attention to adding any plugins that our PhoneGap Build application uses. The PhoneGap Build system would read the config.xml and use it to install the plugin into the build system. We need to perform this step ourselves. Open the config.xml file that you moved from your original PhoneGap Build folder. Your plugins will be individually listed in elements. The Cordova CLI command to add a plugin is
$ cordova plugin add
For adding the Statusbar plugin it would be:
$ cordova plugin add cordova-plugin-statusbar
If you need to install a specific version of plugin, append the version number after the plugin name. For example, if I wanted to instal the version 2.0.0 of the camera plugin I would use:
$ cordova plugin add cordova-plugin-camera@2.0.0
The final bit of heavy lifting is migrating all the other modifications you may have made to the original config.xml. These are things like app permissions or security settings. Go through the file and copy them into the new config.xml. If you need additional help with an element, see the Cordova documentation.
Once you have migrated the contents of the older config.xml file into the new one, delete the old config.xml from within the www directory. The same is true with the resources directory. Your www directory should only contain your HTML, CSS and JS files
Go ahead and try running the emulate command again
$cordova emulate
It might take longer than the first time, but once it finishes you should see your application running in the emulator!
Next steps…
Now that you have migrated from PhoneGap Build to use the Cordova CLI, there are some additional steps that will still be needed. PhoneGap Build took care of properly signing your applications for development or release. These are steps that you are now going to have to manage and perform. You can read the documentation about signing your applications on the Cordova website.
Good luck in migrating your apps to whatever build solution you use!
A few days ago, Adobe finally officially announced the end of PhoneGap Build. You can read the announcement on the Adobe I/O blog.
I want to first thank the entire PhoneGap team for everything they have done over the years! PhoneGap Build has been a big part of my professional life for a long time. I gave several workshops on it at Adobe MAX, used it as the foundation for my Intro to Mobile Development course at UCSD, and recorded training for LinkedIn Learning. This simple web service could take my HTML, CSS, and JS and create an app I could run on a phone, bypassing so many headaches of getting a local build to work as almost magical. If you want to see how hard it used to be, try finding some of the original instructions for setting up PhoneGap to work in Xcode.
I knew the end of PhoneGap Build was coming for some time, but could not formally say anything. The PhoneGap team had either left Adobe or was on to new projects. It was only a matter of time before something would break the ‘Build’. I tried to be as clear as I could on the Adobe forums to people, “It was time to move on.”
Now PhoneGap is not truly dead. When Adobe bought Nitobi all those years ago, what they really bought were two things; the PhoneGap name and the Build service. The code that is PhoneGap was given to the Apache Foundation and is alive and well as Cordova. So one option is to transition from building with the PhoneGap Service and begin building locally. I will have a guide for this ready in a few days. Another option is to migrate to one of the maintained services that do the same task. I have long been a user of the Ionic Framework, and they have a service, Appflow, which can fit the bill nicely. I wrote a migration guide for that service which you can read here [].
I will be still hanging out in the PhoneGap forums at Adobe for a while, trying to answer questions where I can. Otherwise, look for me hanging out on the Ionic Forums.
Thanks, PhoneGap, and let’s keep pushing the web forward!
Starting with the release of Android Oreo comes the need to support adaptive icons in our applications. Unfortunately, Cordova does not support this style of Icons directly yet. If you have built a Cordova application and installed it on either an Android device running Oreo or Pie, you will see your icon is shrunken within a white circle. To fix this we need to use Adaptive icons to have a proper looking app icon. I just released a lesson on egghead.io will show you how to generate an adaptive icon and adjust your config.xml file so it can be used.
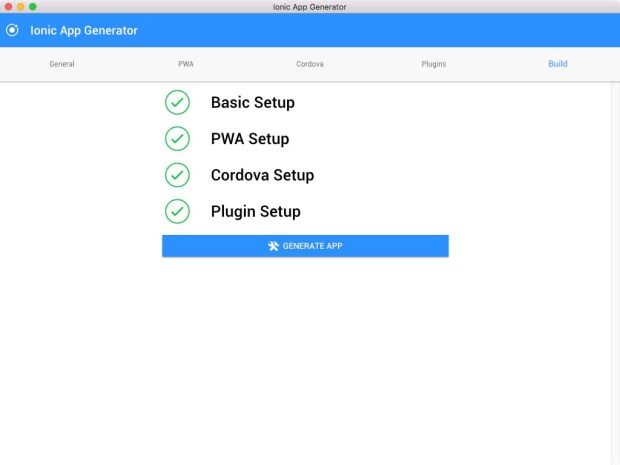
I am happy to announce the release of a new utility for generating Ionic-based applications, Ionic App Generator (macOS and Windows). The goal of this app is to allow you to completely configure all the aspects of a new Ionic application through one single appliction.
The general screen exposes the main settings of the Ionic CLI’s start command.
Beyond the general settings, you can also define the manifest.json file used by Progressive Web Apps.
PWA’s manifest.json screen
Leveraging my experience in writing ConfiGAP, I exposed some of the key settings within the config.xml for Cordova applications.
Config.xml editor
The full collection of Ionic Native plugins are available to be installed in your application as well.
Once you have configured your application’s settings, just click the generate app button, and the tool will go through the process of generating the app.
This app is built on Electron and use Ionic for its user interface (of course). I will be writing up some discoveries I learned while building this utility shortly.
By design, the Ionic Native Mocks I wrote are very generic. They just return the bare minimum amount of data for them to function. But for them to be more useful in your project, you probably will want to customize them. In this blog post, I will show you how to do this. For this example, we will customize the BarcodeScanner mock, in part, as it is was the plugin that inspired the project.
In your existing Ionic project, first import the actual Ionic native module:
In your project, create a new directory named mocks, and create another directory named barcodescanner. Within that directory, download the index.ts file from Github into this directory.
Now let’s adjust out app.module.ts file. Like all Ionic Native modules, we need to import it.
import { BarcodeScanner } from '@ionic-native/barcode-scanner';
Also import our plugin mock as well.
import { BarcodeScannerMock } from '../mocks/barcodescanner';
Instead of including the Ionic Native plugin directly into the providers array, we instead tell Angular to provide a mapping to our mock. This allows us to keep the rest of application referencing the real Ionic Native module, yet use the code from the mock instead.
At this point we could build our app, making calls to the barcode scanner plugin without needing to install on an actual device. But, out of the box, the barcode scanner is going to return an empty string.
But, let’s have it return something that we might want our user to scan. For my original app, it was a QR code on our packaging. Open the index.ts file within our project and change the scan function to
scan(options?: BarcodeScannerOptions): Promise {

  let code='Your Custom Response Here';

  let theResult:BarcodeScanResult= {format:'QR_CODE', cancelled:false, text:code };

  return new Promise((resolve, reject) => {

    resolve(theResult);

  });

}
Save the file, and run the application. Now when you call the barcode scanner, it will return your custom data.
When you are ready to use the real plugin, change the provider and remove the import of the mock. And there you have a basic guide to customizing your Ionic Native Mocks.
I had the good pleasure of presenting to a full room at the recent SoCal Code Camp on the Ionic Framework. Here are my slides from the talk.
The Ionic Framework combines Google’s Angular with Apache’s Cordova to create fast and beautiful cross-platform mobile apps for iOS and Android (and Electron or Progressive Web Apps). Built atop the web technologies you know and love, this solution can help take your web skills beyond the browser.
I am pleased to announce I will be giving live online training on Ionic through O’Reilly training. The online sessions will be held on June 5 & 6, 2017 from 7:00 am – 10:00 am PDT.
By the end of this live, online course, you’ll understand:
How Ionic, Cordova, and Angular work together to create hybrid mobile apps
How to design and program Ionic apps
How to publish your applications to the app stores
And you’ll be able to:
Generate Ionic applications using the Ionic CLI
Use common Ionic UI components
Extend your Ionic applications with Ionic Native
Preview your applications on your devices
Compile your applications to ready them for submission to mobile app stores
Here is the course outline:
The timeframes are only estimates and may vary according to how the class is progressing
DAY 1
Introduction to Ionic (20 minutes)
Lecture: What’s new in Ionic 2; introduction to the Ionic CLI; Ionic file structure
Hands-on exercise: Create an Ionic blank template
Introduction to Angular and TypeScript (30 minutes)
Lecture: Introduction to Angular and TypeScript
Hands-on exercise: Short quiz
Building your first app (30 minutes)
Lecture: Building your first app with Ionic2Do; using Ionic serve to preview your application
Hands-on exercise: Compile and run your Ionic2Do app locally in the browser
Break (10 minutes)
Styling your Ionic app (30 minutes)
Lecture: How Ionic apps are themed; using Ionic View to quickly preview the app on your device
Hands-on exercise: Preview your app on your mobile device (with data stored remotely)
Ionic Native (30 minutes)
Lecture: Adding native touches to your application using Cordova plugins via Ionic Native; publishing the application to the app stores
Hands-on exercise: Replace the JavaScript dialog with a native dialog
Debugging Ionic applications (20 minutes)
Lecture: How to debug your application
Hands-on exercise: Use Chrome or Safari to remote debug your application
Wrap-up and Q&A (10 minutes)
DAY 2
Building your second app (30 minutes)
Lecture: Building an app with IonicParks; exploring Ionic Tabs; loading data; Ionic Lists
Hands-on exercise: Build an application using the local data file and rendering the park list
Ionic navigation (30 minutes)
Lecture: How navigation works in an Ionic application; using the Ionic generate command to improve your workflow; designing the park details screen
Hands-on exercise: Generate and populate the park details screen of the app
Google Maps integration (30 minutes)
Lecture: Adding a map to your application; custom classes
Hands-on exercise: Add a live Google map to your application
Break (10 minutes)
Exploring other Ionic components (30 minutes)
Lecture: Common Ionic components (slides, popover, date and time, toast, grid, and gestures)
Hands-on exercise: Short quiz
Accelerate your application’s development and features (30 minutes)
Lecture: The larger elements of Ionic that can accelerate your application’s development and features (exploring Ionic.io, deploy, build, notification, and users)
When you create a new Ionic application, six plugins are automatically installed. This post will take a brief look at them and how they are used within your Ionic app.
What is a Cordova plugin?
A plugin is a bit of add-on code that provides JavaScript interface to native components. They allow your app to use native device capabilities beyond what is available to pure web apps.
If your application is going to run on Android, this plugin is critical if you want to interact with any external resources. The Navigation, Intent and Network Request whitelists are defined within the config.xml file.
This plugin allows you to customize the Android and iOS statusbar. Starting with iOS 7, the webview that would contain our Ionic application would have the statusbar overlaid with the web content. In the default app initialization code, this plugin is called to reset the positioning.
To enable better development logging while running on device, this plugin is installed for us. As a reminder, you should remove this plugin before making a production build.
The other plugin used during the app initialization code is the Splashscreen plugin. It is used to hide your splash screen image once the app is ready.
The final pre-installed plugin is the Ionic keyboard plugin. One issue with working with the device’s native keyboard was how the content in the webview responded. This plugin gives you more control in interacting with the keyboard. Notably, the ability to show and hide it programmatically, hide the Accessory Bar and disable scrolling of the content.
As you can see from these brief descriptions, these six plugins provide some of the common interface adjustments almost all Ionic developers would perform on their applications. Now, you should have a better idea of why they are pre-bundled for us.
If you want to learn more about developing Ionic applications, you can get a copy of Mobile App Development with Ionic 2 from your favorite bookseller.


You must be logged in to post a comment.